
Định nghĩa: Annotation là tính năng giúp add thêm thông tin vào 1 object. Nó có thể được dùng cho class, method, variable, và parameters. TestNG cung cấp rất nhiều loại annotation cho các mục đích khác nhau, trong đó có các annotation phục vụ cho mục đích: xử lý trước và sau method Test. Vì sao cần xử lý trước và sau Test:
- Cần tạo môi trường trước khi thực hiện test.
- Cần xóa hết các trạng thái sau khi thực hiện test hoặc cần phải thực hiện các hành động không liên quan đến method Test nhưng cần thiết như screenshot, delete session hoặc close connection…
TestNG cung cấp 5 annotation ở dạng Before/After:
- @BeforeSuite/@AfterSuite
- @BeforeTest/@AfterTest
- @BeforeGroups/@AfterGroups
- @BeforeClass/@AfterClass
- @BeforeMethod/@AfterMethod
I. Khai báo annotation trên 1 class
Thứ tự chạy của chúng sẽ được thể hiện qua ví dụ sau:
public class TestAnnotation {

	@BeforeSuite
	public void beforeSuite() {
		System.out.println("Before Suite");
	}

	@AfterSuite
	public void afterSuite() {
		System.out.println("After Suite");
	}

	@BeforeTest
	public void beforeTest() {
		System.out.println("Before Test");
	}

	@AfterTest
	public void afterTest() {
		System.out.println("After Test");
	}

	@BeforeClass
	public void beforeClass() {
		System.out.println("Before Class");
	}

	@AfterClass
	public void afterClass() {
		System.out.println("After Class");
	}

	@BeforeGroups(groups = { "testOne" })
	public void beforeGroupOne() {
		System.out.println("Before Group testOne");
	}

	@AfterGroups(groups = { "testOne" })
	public void afterGroupOne() {
		System.out.println("After Group testOne");
	}

	@BeforeGroups(groups = { "testTwo" })
	public void beforeGroupTwo() {
		System.out.println("Before Group testTwo");
	}

	@AfterGroups(groups = { "testTwo" })
	public void afterGroupTwo() {
		System.out.println("After Group testTwo");
	}

	@BeforeMethod
	public void beforeMethod() {
		System.out.println("Before Method");
	}

	@AfterMethod
	public void afterMethod() {
		System.out.println("After Method");
	}

	@Test(groups = { "testOne" })
	public void testOneMethod() {
		System.out.println("Test method One");
	}

	@Test(groups = { "testTwo" })
	public void testTwoMethod() {
		System.out.println("Test method Two");
	}

}
Và ta cần thêm 1 config cho file testng.xml
<!DOCTYPE suite SYSTEM "http://testng.org/testng-1.0.dtd" >

<suite name="First Suite" verbose="1">
	<test name="First Test">
		<classes>
			<class name="testannotation.TestAnnotation">
				<methods>
					<include name="testOneMethod" />
				</methods>
			</class>
		</classes>
	</test>
	<test name="Second Test">
		<classes>
			<class name="testannotation.TestAnnotation">
				<methods>
					<include name="testTwoMethod" />
				</methods>
			</class>
		</classes>
	</test>
</suite>
Và đây là kết quả:
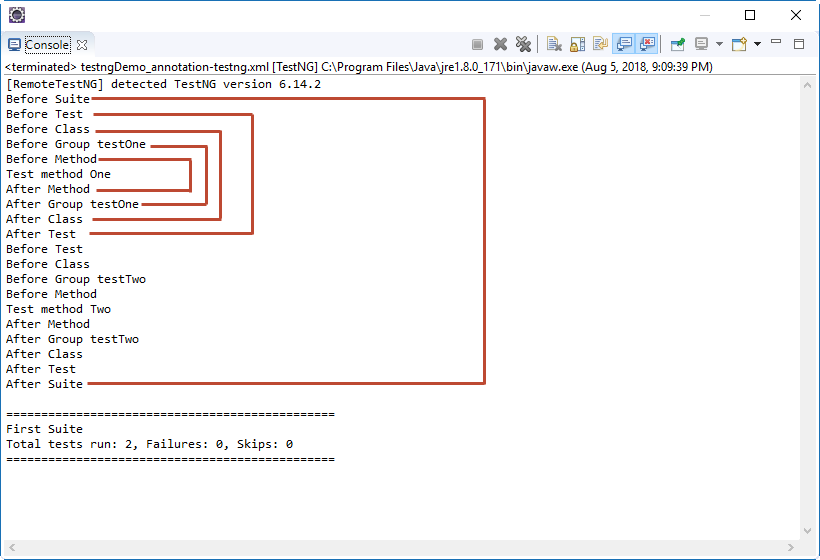
Từ đây, ta có thể hiểu được thứ tự chạy chúng:
- Khi bắt đầu thì mở từ Suite > Test > Group > Class > Method
- Khi kết thúc thì đóng từ Method > Class > Group > Test > Suite
II. Khai báo annotation khi có extend
Ở phía trên, chúng ta đã xem về cách sử dụng annation trên 1 class, chúng ta sẽ băn khoăn là thế nhưng chúng ta viết theo dạng POM thì có cả BaseTest, không biết thứ tự run annotation sẽ như thế nào?
Hãy xem ví dụ dưới đây:
Ta có class BaseTest:
public class BaseTest {

	@BeforeClass
	public void beforeBaseClass() {
		System.out.println("Parent Before Class method");
	}

	@AfterClass
	public void afterBaseClass() {
		System.out.println("Parent After Class method");
	}

	@BeforeMethod
	public void beforeBaseMethod() {
		System.out.println("Parent Before method");
	}

	@AfterMethod
	public void afterBaseMethod() {
		System.out.println("Parent After method");
	}

}
Class Test:
public class TestClass extends BaseTest {

	@BeforeClass
	public void beforeChildClass() {
		System.out.println("Child Before Class method");
	}

	@AfterClass
	public void afterChildClass() {
		System.out.println("Child After Class method");
	}

	@BeforeMethod
	public void beforeChildMethod() {
		System.out.println("Child Before method");
	}

	@AfterMethod
	public void afterChildMethod() {
		System.out.println("Child After method");
	}

	@Test
	public void testMethod() {
		System.out.println("Test method under TestClass");
	}

}
Và file testng.xml:
<!DOCTYPE suite SYSTEM "http://testng.org/testng-1.0.dtd" >

<suite name="Inheritance Suite" verbose="1">
	<test name="Inheritance Test">
		<classes>
			<class name="testannotation.TestClass" />
		</classes>
	</test>
</suite>
Đây là kết quả:
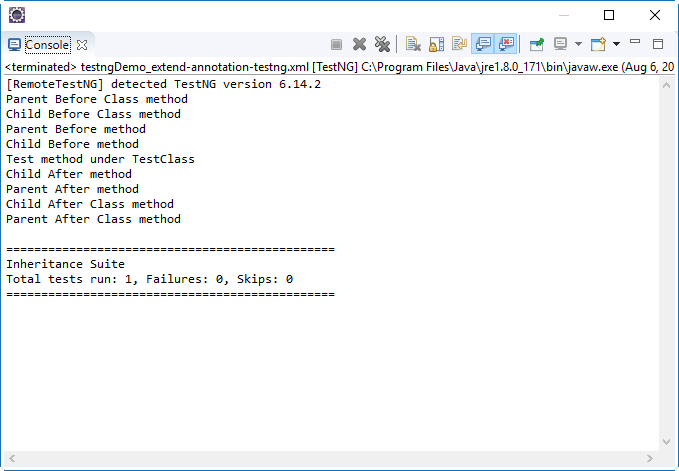
Thứ tự chạy khi có extend sẽ là:
- Khi bắt đầu: Parent Before > Child Before
- Khi kết thúc: Child After > Parent After
III. Điểm khiến người học hay nhầm lẫn
1. BeforeTest và AfterTest
Test ở đây là 1 tập hợp nhiều test cases là con của test suite, được dùng để gom các test cases ở các class khác nhau. Cách gom nhóm thông qua file xml, ví dụ file testng.xml
2. BeforeMethod và AfterMethod
Method ở đây chính là test case, những method này được đánh dấu bằng @Test
3. BeforeClass và AfterClass
Class ở đây là class (java) chứa các test cases.
4. BeforeGroup và AfterGroup
Group cũng là tập hợp các test cases, những cách gom nhóm của nó thực hiện quá annotation. Ví dụ @BeforeGroups(groups = { "testOne" })

IV. Tổng kết
Trong một project, không nhất thiết phải sử dụng hết tất cả các annotation này, nhưng ta cần phải biết thứ tự để từ đó control code của mình chạy theo thứ tự mình mong muốn, ví dụ như chụp screentshot ở cuối mỗi test, khởi tạo connection để đọc file Excel…
[…] [Bài 3] Cách sử dụng Annotation After/Before trong TestNG […]
anh Giang ơi, anh biết cách phân biệt giữa @BeforeTest và @BeforeClass hông anh? Em đang bị confuse chỗ này
Ủa, bài viết này chính là để phân tích sự khác biệt giữa những cái đấy mà em. Em không tìm thấy điểm khác nhau ah?
—
Update: Anh đã sửa lại bài viết, thêm các thông tin để em có thể hiểu sự khác nhau những annotation này.
Dạ ý em là khi nào thì mình dùng @BeforeTest khi nào dùng @BeforeClass á anh.
Anh đã update câu trả lời, em reload lại bài viết nhé.